'/%3e%3cpath%20id='cross_2'%20data-name='cross%202'%20class='cls-2'%20d='M20.612,30.43h0a5.361,5.361,0,1,0-10.723,0H0A33.709,33.709,0,0,1,30.569,0V9.75a5.361,5.361,0,1,1,0,10.723V30.43Z'%20transform='translate(67.193%200.007)%20rotate(90)'/%3e%3cpath%20id='cross_3'%20data-name='cross%203'%20class='cls-3'%20d='M20.612,30.43h0a5.361,5.361,0,1,0-10.723,0H0A33.709,33.709,0,0,1,30.569,0V9.75a5.361,5.361,0,1,1,0,10.723V30.43Z'%20transform='translate(67.186%2067.041)%20rotate(180)'/%3e%3cpath%20id='cross_4'%20data-name='cross%204'%20class='cls-4'%20d='M20.6,30.5h0a5.361,5.361,0,1,0-10.723,0H0A33.71,33.71,0,0,1,30.56,0V9.818a5.361,5.361,0,1,1,0,10.723V30.5Z'%20transform='translate(0%2067.041)%20rotate(-90)'/%3e%3c/svg%3e)
스키마 파일(.sfn) 만들기
WebSpace의 재미는 작은 파일 하나에서 시작됩니다. 스키마 파일(.sfn)에 저장할 데이터와 권한을 정하고 배포하면 데이터베이스와 API가 함께 준비됩니다. 화면에서 입력한 내용이 실제로 저장되고, 다른 사용자의 화면에 실시간으로 나타나는 서비스까지 이어서 만들 수 있습니다.
스키마 파일은 서비스의 설계도입니다. 파일을 저장하는 단계에서는 실제 데이터베이스가 바뀌지 않으며, API빌드에서 배포해야 실행 환경에 반영됩니다.
만드는 흐름
- 스키마 파일을 만듭니다.
- 테이블과 컬럼을 구성합니다.
- API별 접근 권한을 확인합니다.
- 저장 엔진을 선택하고 배포합니다.
- HTML이나 앱에서 생성된 API를 호출합니다.
처음부터 모든 항목을 완성할 필요는 없습니다. 작은 테이블 하나로 시작해 실제 화면에서 데이터를 넣어 본 뒤 필요한 구조와 권한을 늘려가는 방법이 가장 이해하기 쉽습니다.
새 스키마 파일 만들기
워크스페이스에서 만들기 > 템플릿 파일 > 새 스키마(DB)를 선택합니다.
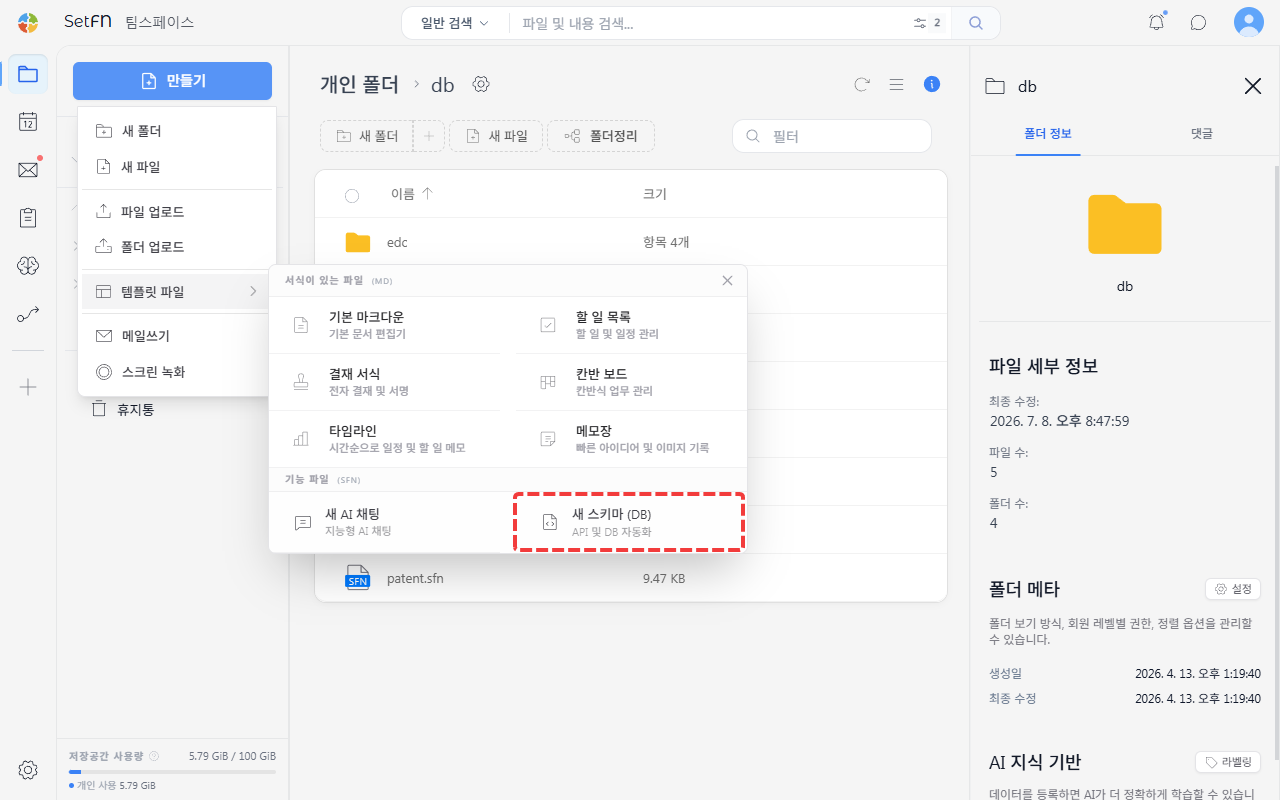
파일 이름을 입력하고 저장하면 스키마 파일이 만들어집니다.
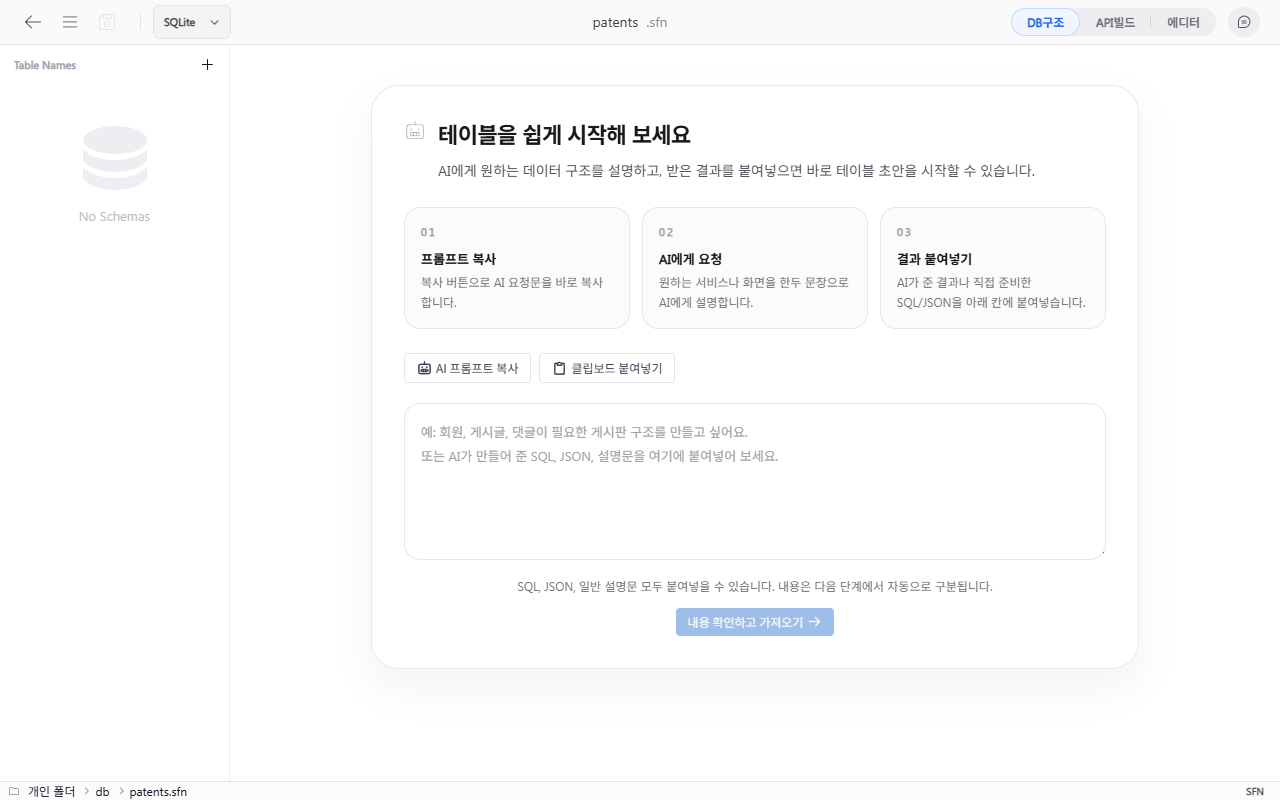
이 단계에서는 데이터베이스 엔진을 고르지 않습니다. 데이터 구조를 먼저 만든 다음 SQLite3, PostgreSQL, MySQL 또는 MariaDB 중 실제 저장 엔진을 배포 단계에서 선택합니다.
데이터 구조 만들기
처음부터 직접 만들거나 AI로 초안을 잡고 다듬을 수 있습니다. 이미 사용하던 SQL이 있다면 가져와 시작해도 됩니다.
1. AI로 초안 만들기
테이블 용어를 모두 알지 못해도 괜찮습니다. 어떤 정보를 누구와 관리하고 싶은지 먼저 설명하면 AI가 시작할 구조를 만들어 줍니다.
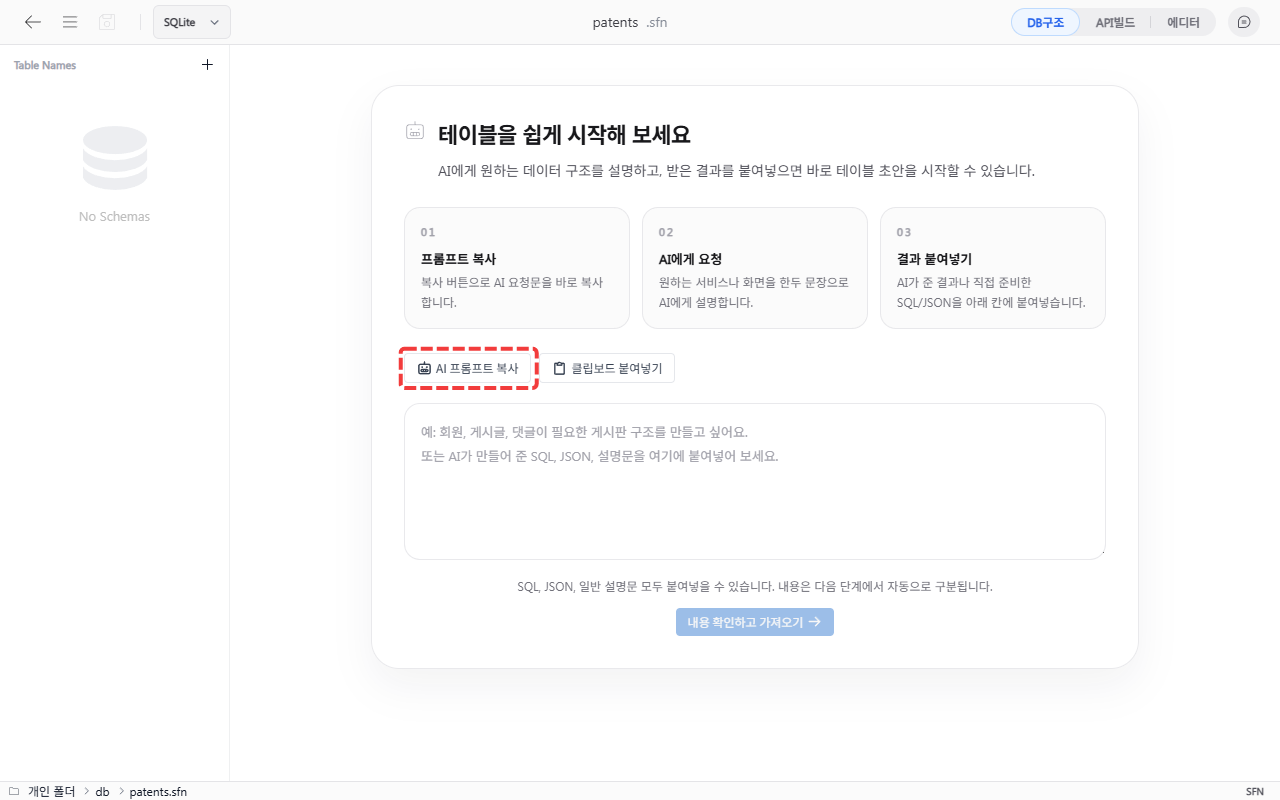
AI 프롬프트 복사버튼을 클릭합니다.- 사용하는 AI 서비스 채팅창에 복사한 프롬프트를 붙여넣습니다.
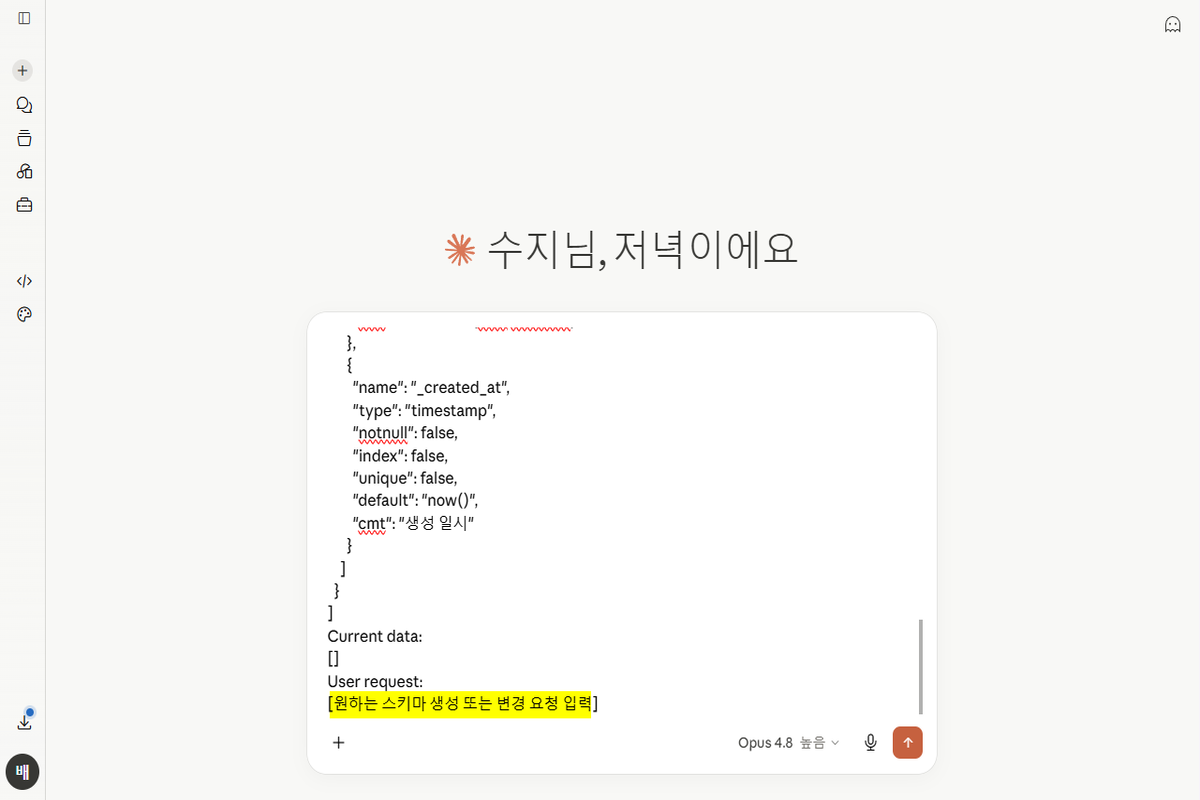
- 안내문 아래의
User request에 만들고 싶은 서비스를 적습니다.예: 특허명, 출원번호, 담당자와 진행 상태를 관리하고 담당자 본인과 관리자만 수정할 수 있게 만들어 주세요.
- AI가 만든 JSON을 복사해 가져오기 화면에 붙여넣습니다.
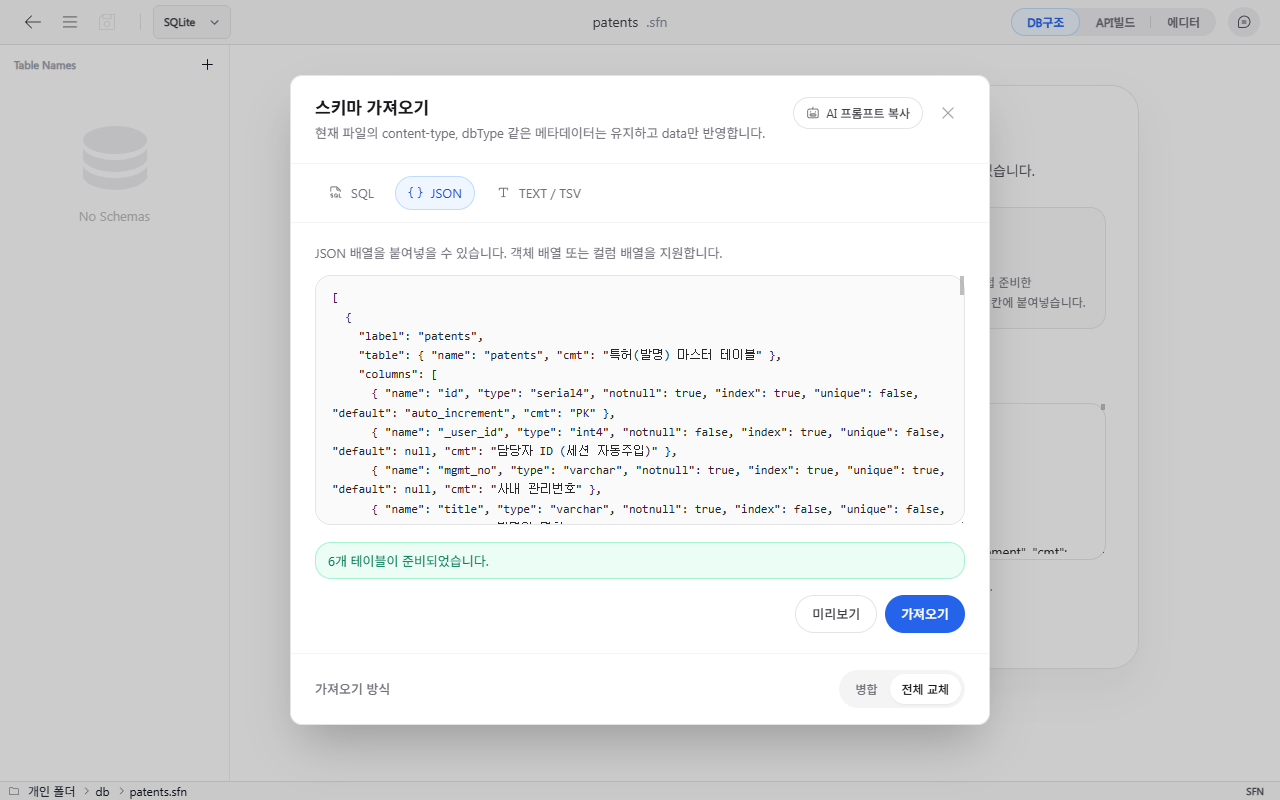
가져오기버튼을 누르면 아래 그림과 같이 데이터베이스 테이블이 생성됩니다.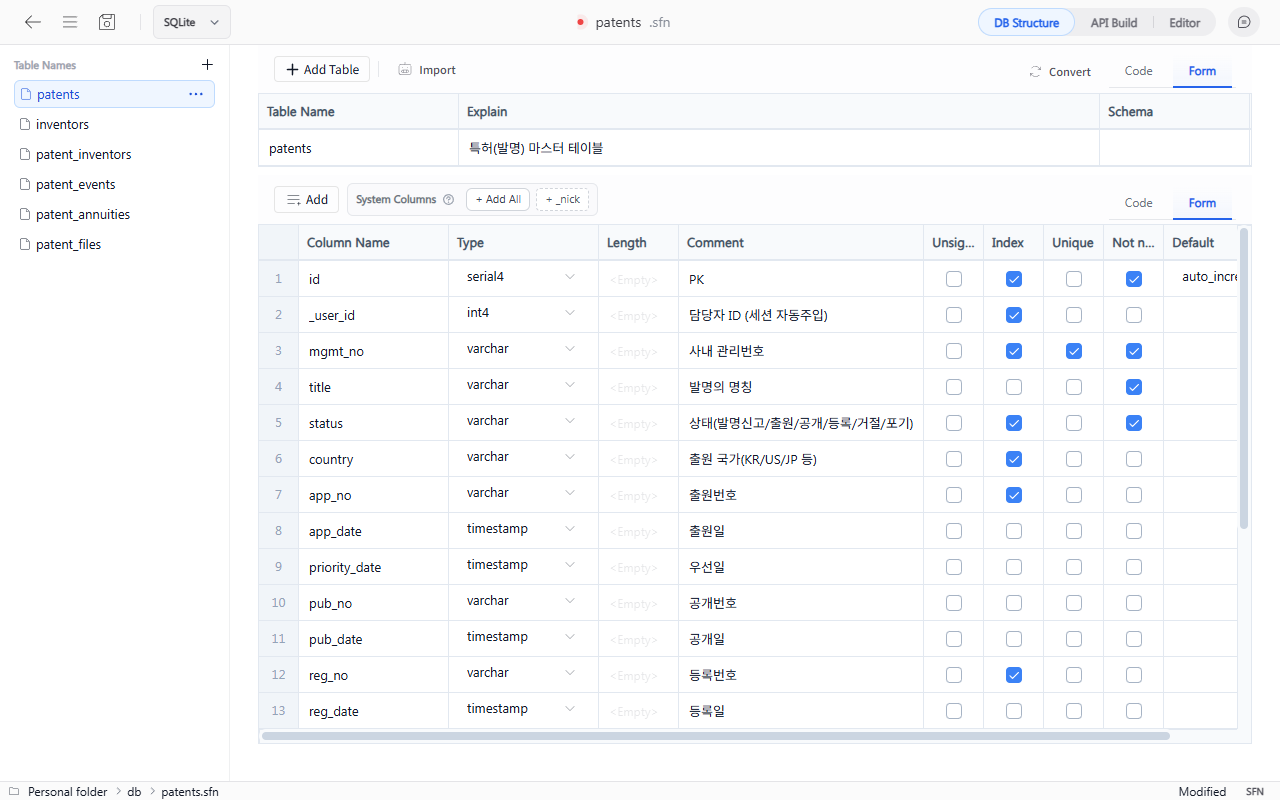
복사되는 안내문에는 스키마 파일의 형식과 작성 규칙이 함께 들어 있습니다. 특정 데이터베이스에만 맞춘 SQL보다 여러 저장 엔진에서 사용할 수 있는 구조를 우선합니다.
AI 프롬프트 복사 버튼이 실제로 복사하는 내용은 다음과 같습니다. 이 프롬프트도 스키마 파일을 직접 손으로 짜는 대신 여기서부터 시작합니다.
You are a database schema assistant.
Return only valid JSON.
Do not add explanations.
Do not wrap the answer in markdown fences.
Return only the data array for a SetFN schema file.
Do not include content-type, dbType, or apiBuild.
Current deployment engine: SQLite.
The storage engine is deployment configuration, not schema syntax. Keep the schema portable across SQLite, PostgreSQL, MySQL, and MariaDB.

Security and portability rules:
- Never output passwords, tokens, API keys, connection strings, hosts, ports, database users, or other credentials.
- Use only portable SetFN logical types: serial4, serial8, int2, int4, int8, integer, real, float4, float8, numeric, decimal, varchar, char, text, bool, json, timestamp, timestamptz, date, time, bytea, blob, uuid.
- Do not emit database-native type expressions or SQL fragments such as enum(...), SET(...), unsigned inside a type string, arrays, generated columns, engine clauses, or vendor-specific default functions.
- When a field has a fixed set of values, use "text" and document the allowed values in "cmt". Do not invent an enum property.
- Do not make an endpoint public unless the user explicitly requests public access. Never make create, update, or delete public by default.
- Default every table to signed-in access. Use ownerOnly only with a valid owner column such as "_user_id".

Use canonical defaults regardless of deployment engine.
- Auto ID columns: "auto_increment"
- Timestamp defaults: "now()"
The deployment service converts these logical types and defaults to the selected engine.

Recommended system columns:
- "_user_id": owner user id. Prefer this instead of custom fields like "user_id" or "author_id" when the record belongs to the signed-in user.
- "_nick": writer nickname. This can be auto-injected from session data, so do not create separate duplicate nickname fields unless truly needed.
- "_created_at": created timestamp. Prefer this instead of custom fields like "created_at".
- "_updated_at": updated timestamp. Prefer this instead of custom fields like "updated_at".
- "_deleted_at": optional soft-delete timestamp. Include only when soft delete is needed.

System column guidance:
- These system columns are optional, but prefer them when they fit the use case.
- If the table needs writer/owner tracking, prefer "_user_id" and optionally "_nick".
- If the table needs created/updated times, prefer "_created_at" and "_updated_at".
- Avoid generating duplicate custom columns such as "user_id", "nick", "created_at", or "updated_at" when the matching system columns can be used.
- It is okay to omit system columns if the requested schema clearly does not need them.

Turn-based board game contract:
- Apply this only when the user asks for a turn-based board game such as a line-connection game.
- Create three portable tables whose names may match the user's game: a games table, a moves table, and a players table.
- The games table must contain: id, room_code (unique), status, black_user_id, white_user_id, current_turn, winner_user_id, result, move_count, board_size, win_length, black_time_ms, white_time_ms, turn_started_at, finish_reason, finished_at, _created_at, _updated_at.
- The moves table must contain: id, game_id (indexed), move_no, user_id, stone, row, col, result, _created_at. Make (game_id, row, col) unique when the schema format supports it.
- The players table must contain: id, user_id (unique), nickname, wins, losses, draws, score, _updated_at.
- Use portable logical types and defaults. Do not add an eventProcessor field to table data. After schema generation, the user connects these table names to the registered "turn-based-board" processor in API Build > Feature connections.
- Do not invent processor IDs or game-specific server handlers.

Required shape:
[
  {
    "label": "users",
    "table": { "name": "users", "cmt": "회원 테이블" },
    "columns": [
      {
        "name": "id",
        "type": "serial4",
        "notnull": true,
        "primary": true,
        "index": false,
        "unique": false,
        "default": "auto_increment",
        "cmt": "PK"
      },
      {
        "name": "_user_id",
        "type": "int4",
        "notnull": true,
        "index": true,
        "unique": false,
        "default": null,
        "cmt": "소유자 ID (세션 자동주입)"
      },
      {
        "name": "_created_at",
        "type": "timestamp",
        "notnull": false,
        "index": false,
        "unique": false,
        "default": "now()",
        "cmt": "생성 일시"
      }
    ],
    "permissions": {
      "security": { "login": true, "ownerColumn": "_user_id" },
      "ops": {
        "list": { "login": true },
        "view": { "login": true },
        "create": { "login": true },
        "update": { "login": true, "ownerOnly": true },
        "delete": { "login": true, "roles": ["admin"] }
      }
    }
  }
]

Current data:
[]

User request:
[원하는 스키마 생성 또는 변경 요청 입력]
AI 결과는 어디까지나 초안입니다. 이름이 이해하기 쉬운지, 개인정보가 포함됐는지, 누가 조회·수정할 수 있어야 하는지를 배포 전에 직접 확인하세요.
2. SQL 가져오기
가져오기 > SQL에서 기존 CREATE TABLE 문을 붙여넣을 수 있습니다. SQLite, PostgreSQL, MySQL/MariaDB의 주요 타입, 기본값, 인덱스와 제약조건을 읽어 스키마 파일 구조로 바꿉니다.
워크스페이스에서 SQL 파일을 열었다면 SetFN 스키마로 변환을 사용해도 됩니다. 어느 경로를 사용하든 같은 변환 규칙이 적용됩니다.
3. 화면에서 직접 만들기
표 형태의 편집 화면에서 테이블과 컬럼을 하나씩 추가할 수 있습니다.
테이블 추가
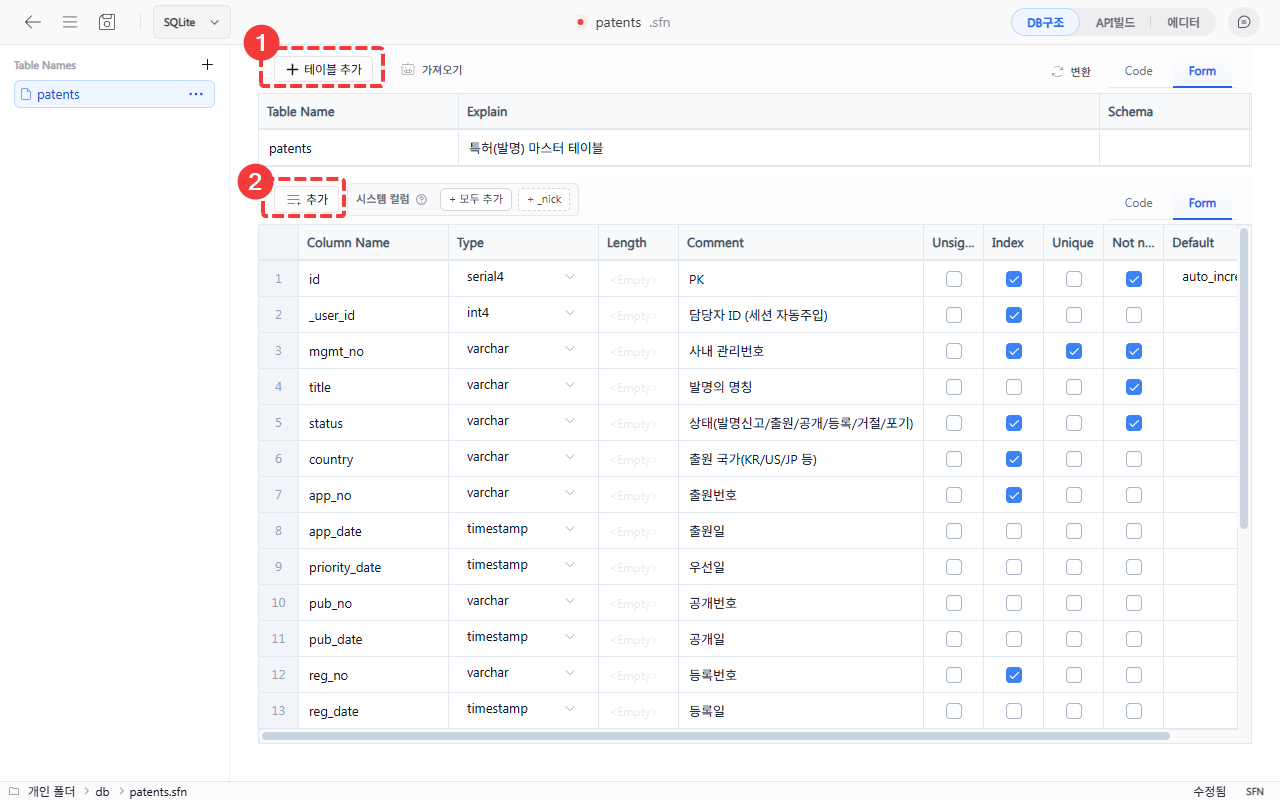 메인 화면 상단의
 + 테이블 추가 버튼을 클릭합니다. 테이블 정보를 입력합니다.
| 항목 | 설명 |
|---|---|
| Table Name | API 주소에도 사용되는 테이블 이름 (예: user_profile) |
| Explain | 사용자가 알아보기 쉬운 테이블 설명 |
| Schema | 데이터베이스 스키마 이름 (예: public) |
컬럼 추가
+ 추가 버튼을 클릭하면 컬럼 목록에 새 행(row)이 하나 추가됩니다.
행 하나가 컬럼 하나에 대응합니다.
아래 항목을 설정할 수 있습니다.
| 항목 | 설명 | 예시 |
|---|---|---|
| Column Name | 컬럼 이름 | user_id, email |
| Type | 데이터 타입 | varchar, int, bool |
| Length | 데이터 길이 | 255 |
| Comment | 컬럼 설명 | 사용자 이름 |
| Default | 기본값 | auto_increment, NULL |
| Unsigned | 양수만 허용 여부 | - |
| Index | 인덱스 설정 여부 | - |
| Unique | 고유값 설정 여부 | - |
| Not null | 필수 입력 여부 | - |
시스템 컬럼 메뉴에서는 _user_id, _nick, _created_at처럼 사용자와 작성 시각을 기록할 때 자주 쓰는 컬럼을 골라 추가할 수 있습니다.
컬럼 복사 및 삭제
컬럼을 우클릭하면 컨텍스트 메뉴가 나타납니다.
- 복사 후 추가: 선택한 컬럼과 동일한 속성의 컬럼을 아래에 복사해 추가합니다.
- 삭제: 선택한 컬럼을 삭제합니다.
4. JSON으로 편집하기
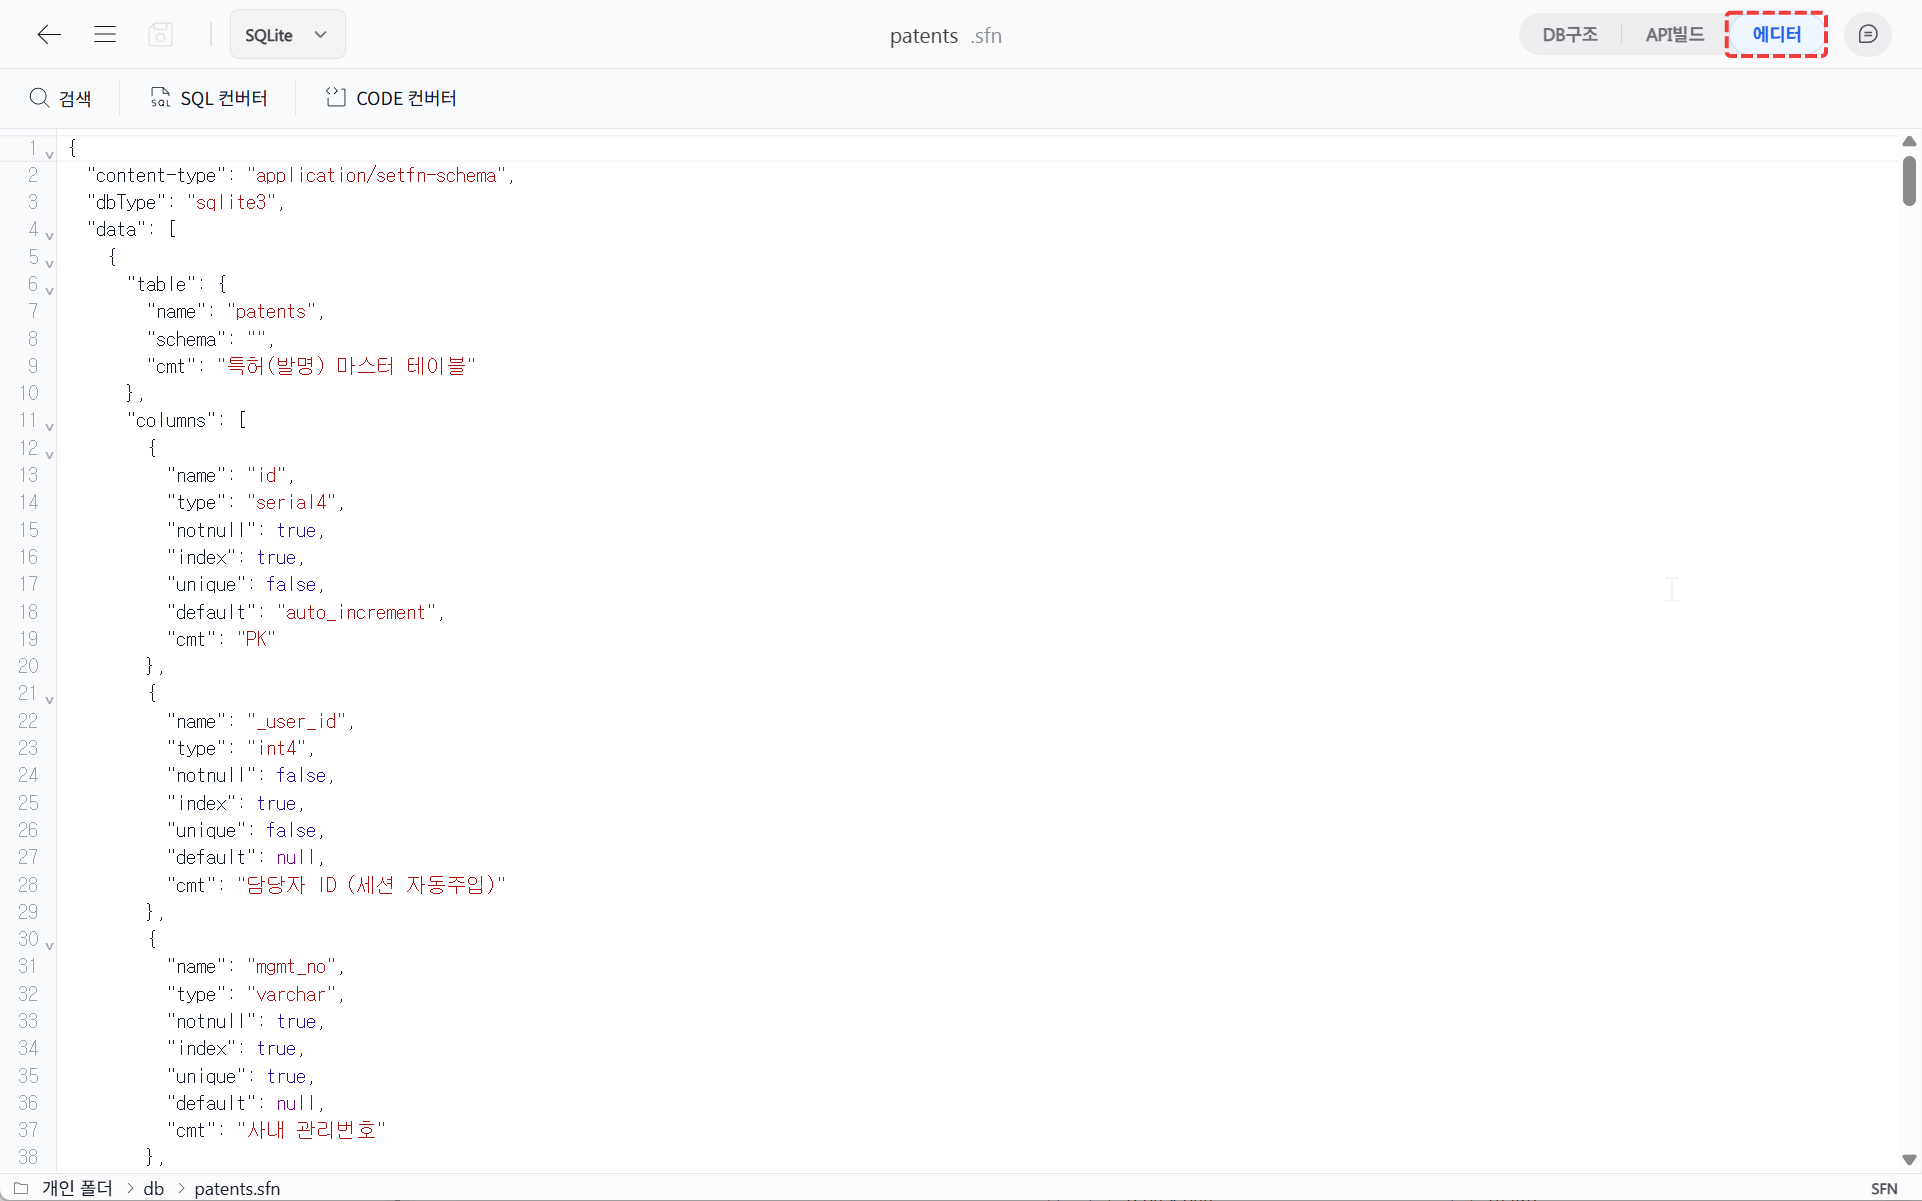 페이지 상단 오른쪽의
 에디터를 누르면 전체 구조를 JSON으로 작성할 수 있습니다. JSON과 표 편집 화면은 같은 내용을 사용하므로 작업에 편한 방식을 오가며 편집하면 됩니다.
아래는 이메일을 저장하는 간단한 사용자 프로필 예시입니다.
{
  "content-type": "application/setfn-schema",
  "dbType": "sqlite3",
  "data": [
    {
      "table": { "name": "user_profile", "schema": "public" },
      "columns": [
        {
          "name": "email",
          "type": "varchar",
          "len": 255,
          "unique": true,
          "notnull": true
        }
      ],
      "label": "사용자 프로필"
    }
  ]
}
dbType은 기존 파일과의 호환을 위한 정보이며 실제 실행 엔진을 확정하지 않습니다. 최종 엔진과 연결 정보는 API빌드의 스토리지 단계에서 정합니다.
데이터만큼 중요한 API 권한
각 API에서 로그인 여부, 최소 레벨, 관리자, 팀과 작성자 본인 데이터만 허용할지를 설정할 수 있습니다.
- 목록 조회에 개인정보가 있다면 공개 권한을 사용하지 않습니다.
- 사용자별 데이터에는 소유자를 구분할 컬럼을 지정합니다.
- 수정과 삭제는 조회보다 좁은 권한으로 시작하는 것이 안전합니다.
- 화면의 권한 요약에서 의도한 조건이 모두 표시되는지 확인합니다.
저장한 다음
왼쪽 위의 저장 버튼이나 Ctrl+S로 스키마 파일을 저장합니다. 이제 API빌드에서 엔드포인트와 권한을 확인하고 실제 데이터베이스로 배포할 수 있습니다.
배포가 끝나면 작은 데이터를 한 건 등록해 보세요. 방금 만든 구조가 API 응답으로 돌아오는 순간부터 스키마 파일은 단순한 문서가 아니라 움직이는 서비스가 됩니다.
알아두기
- 테이블 이름과 컬럼 이름에는 영문 소문자, 숫자, 언더스코어(_)만 사용하세요.
- 컬럼이 많다면 JSON 편집이나 SQL 가져오기를 활용하세요.
- 기존 데이터가 있는 스키마의 덮어쓰기는 관리자 정책에 따라 금지되거나 관리자·배포 담당자에게만 허용될 수 있습니다.
다음 단계
이제 API 빌드 및 데이터베이스 배포하기에서 저장 엔진과 엔드포인트를 확인하고 첫 API를 실행해 보세요.