'/%3e%3cpath%20id='cross_2'%20data-name='cross%202'%20class='cls-2'%20d='M20.612,30.43h0a5.361,5.361,0,1,0-10.723,0H0A33.709,33.709,0,0,1,30.569,0V9.75a5.361,5.361,0,1,1,0,10.723V30.43Z'%20transform='translate(67.193%200.007)%20rotate(90)'/%3e%3cpath%20id='cross_3'%20data-name='cross%203'%20class='cls-3'%20d='M20.612,30.43h0a5.361,5.361,0,1,0-10.723,0H0A33.709,33.709,0,0,1,30.569,0V9.75a5.361,5.361,0,1,1,0,10.723V30.43Z'%20transform='translate(67.186%2067.041)%20rotate(180)'/%3e%3cpath%20id='cross_4'%20data-name='cross%204'%20class='cls-4'%20d='M20.6,30.5h0a5.361,5.361,0,1,0-10.723,0H0A33.71,33.71,0,0,1,30.56,0V9.818a5.361,5.361,0,1,1,0,10.723V30.5Z'%20transform='translate(0%2067.041)%20rotate(-90)'/%3e%3c/svg%3e)
スキーマファイル(.sfn)を作成する
WebSpaceの面白さは、1つの小さなファイルから始まります。スキーマファイル(.sfn)に保存するデータと権限を定義してデプロイすると、データベースとAPIが一緒に準備されます。画面で入力した内容が実際に保存され、ほかのユーザーの画面にリアルタイムで表示されるサービスまで、続けて作ることができます。
スキーマファイルは、サービスの設計図です。ファイルを保存する段階では実際のデータベースは変更されず、APIビルドでデプロイすると実行環境に反映されます。
作成の流れ
- スキーマファイルを作成します。
- テーブルとカラムを構成します。
- APIごとのアクセス権限を確認します。
- ストレージエンジンを選択してデプロイします。
- HTMLやアプリから、生成されたAPIを呼び出します。
最初からすべての項目を完成させる必要はありません。小さなテーブル1つから始め、実際の画面でデータを入力してみてから、必要な構造と権限を増やしていく方法が最も理解しやすいです。
新しいスキーマファイルを作成する
ワークスペースで作成 > テンプレートファイル > 新しいスキーマ(DB)を選択します。
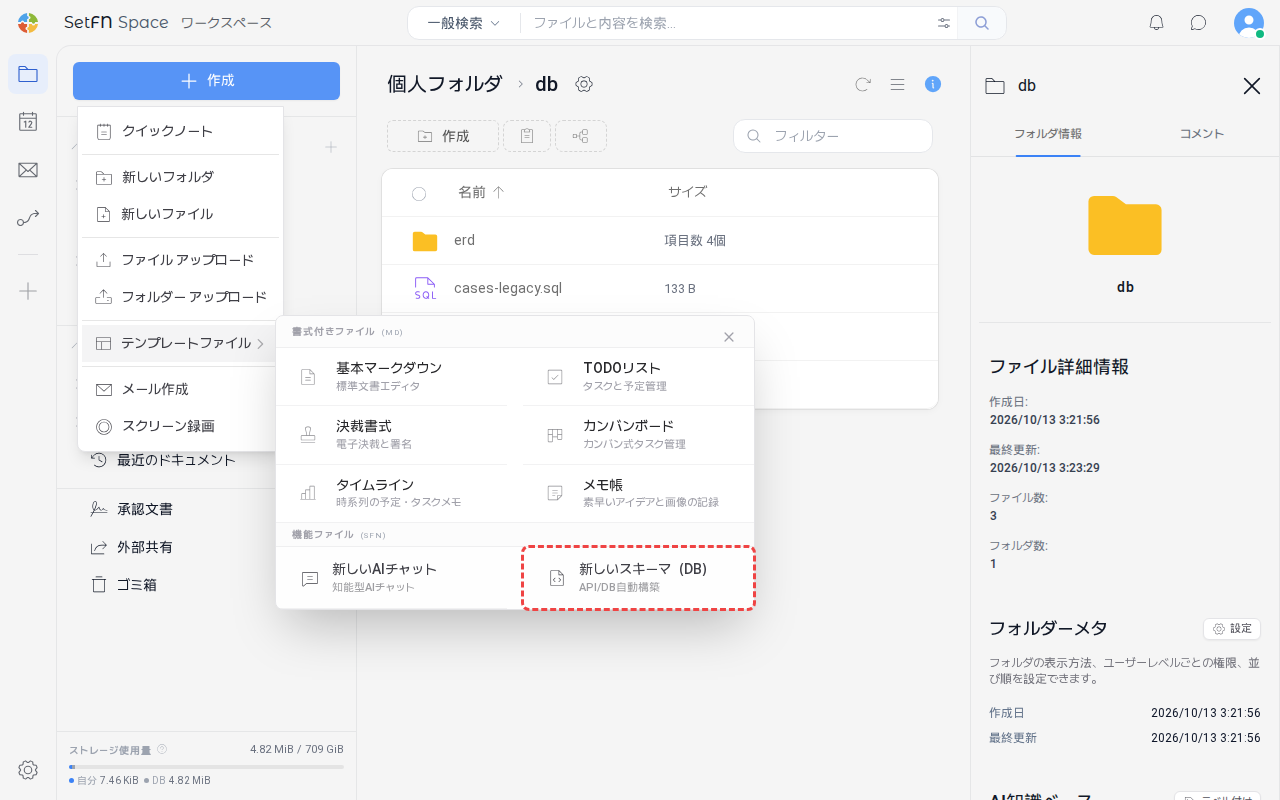
ファイル名を入力して保存すると、スキーマファイルが作成されます。
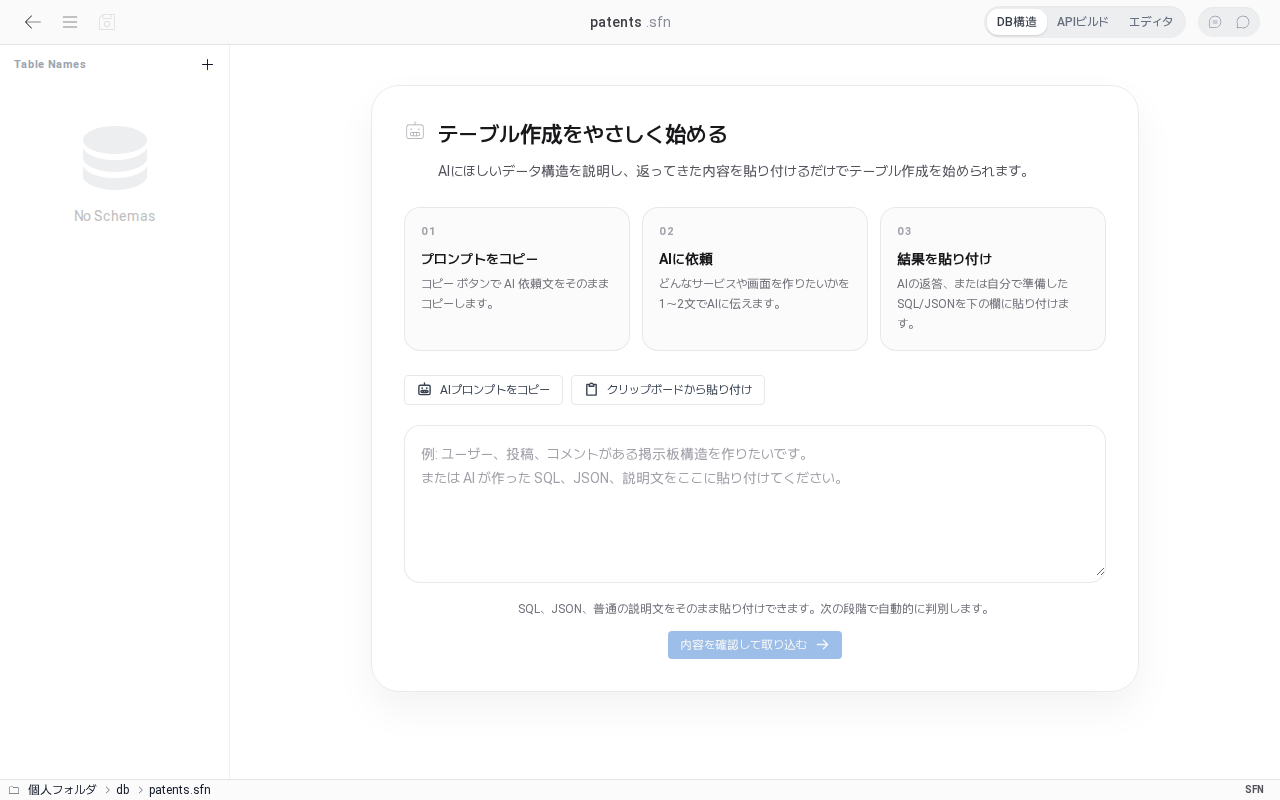
この段階では、データベースエンジンは選択しません。先にデータ構造を作成してから、SQLite3、PostgreSQL、MySQL、MariaDBの中から実際のストレージエンジンをデプロイの段階で選択します。
データ構造を作成する
最初から自分で作成することも、AIで下書きを作ってから調整することもできます。すでに使用しているSQLがある場合は、インポートして始めることもできます。
1. AIで下書きを作成する
テーブルに関する用語をすべて知らなくても問題ありません。どのような情報を誰と管理したいのかを先に説明すると、AIが出発点となる構造を作成します。
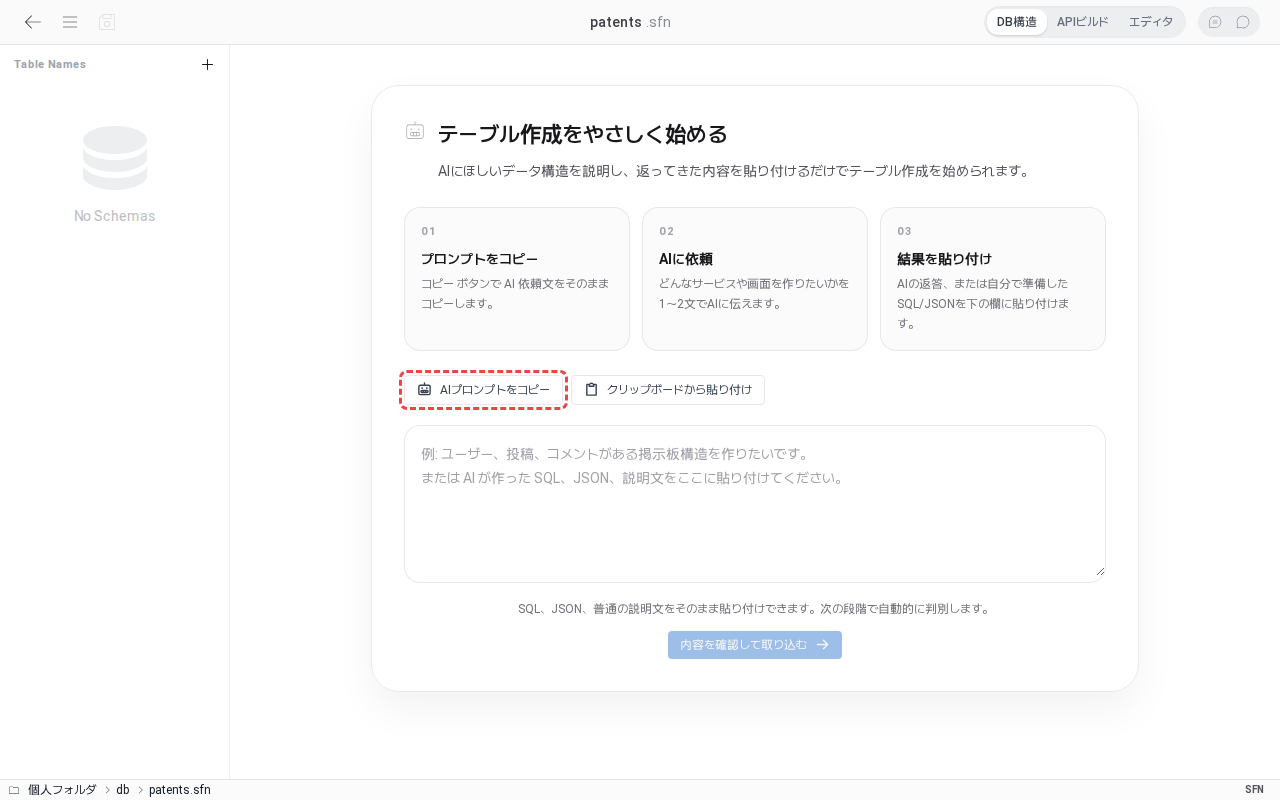
AIプロンプトをコピーボタンをクリックします。- 使用しているAIサービスのチャット欄に、コピーしたプロンプトを貼り付けます。
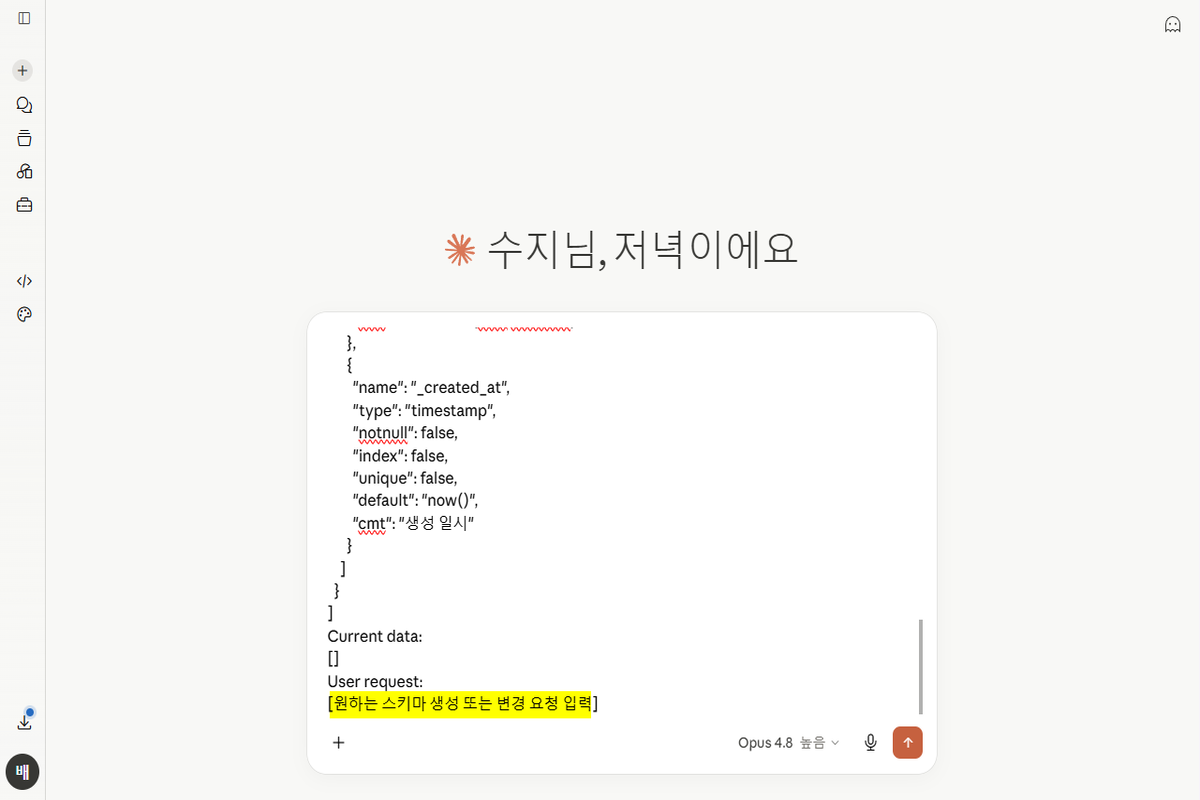
- 案内文の最後にある
## リクエストの下に、作りたいサービスを書きます。例:特許名、出願番号、担当者、進行状況を管理し、担当者本人と管理者だけが変更できるようにしてください。
- AIが作成したJSONをコピーして、インポート画面に貼り付けます。
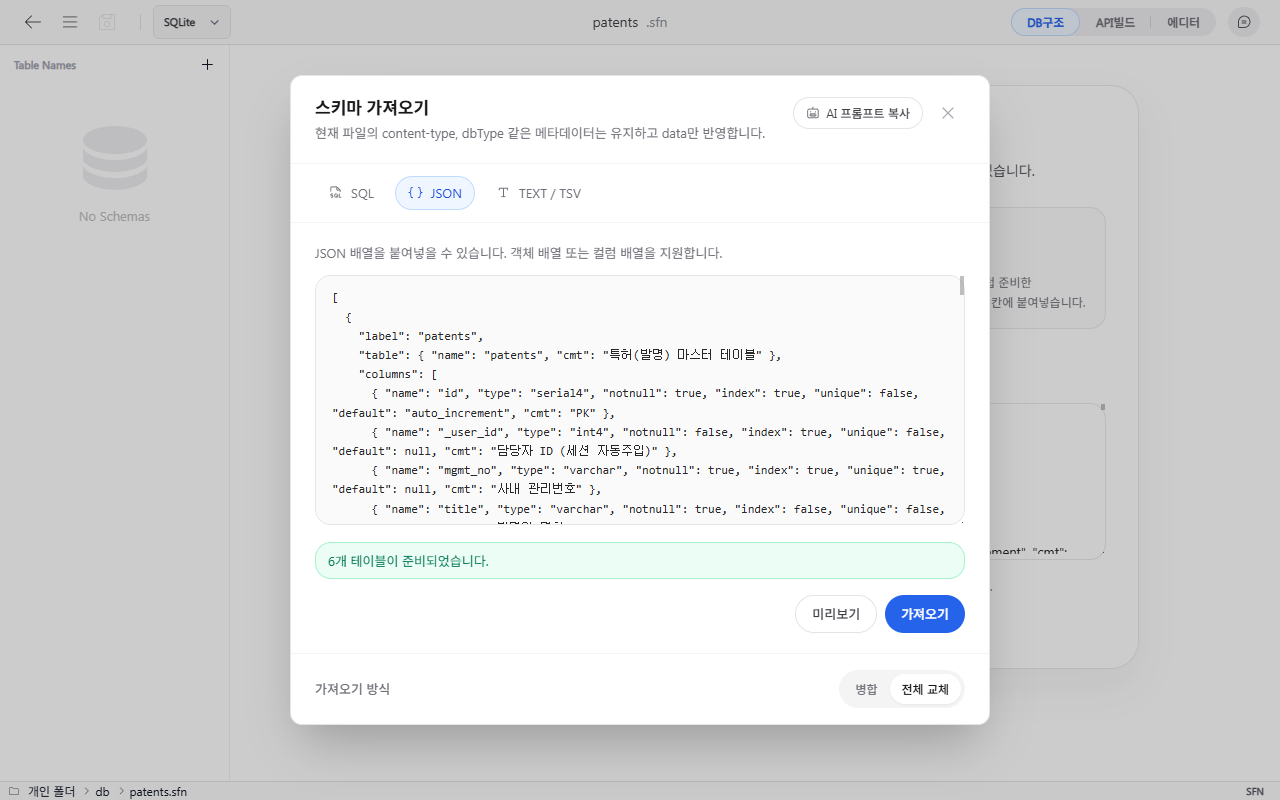
インポートボタンを押すと、次の図のようにスキーマにテーブル構造が作成されます。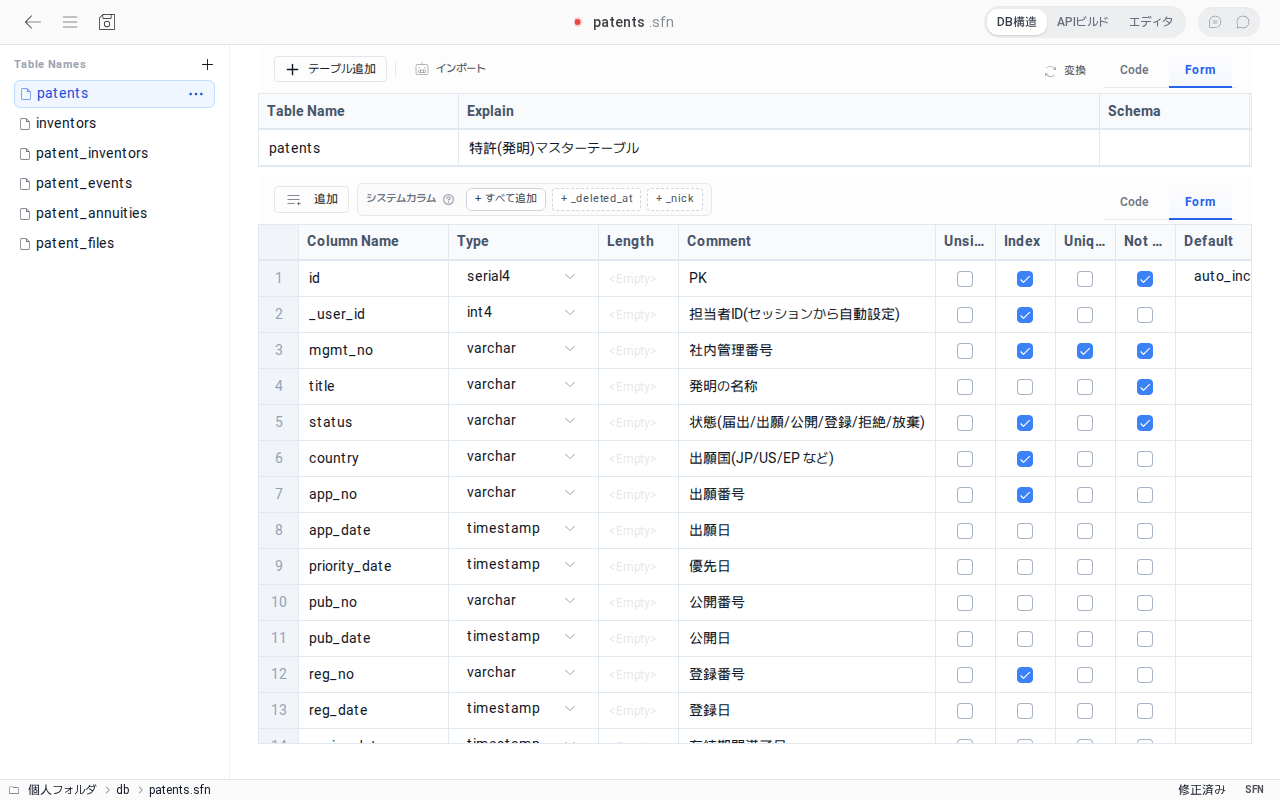
コピーされる案内文には、スキーマファイルの形式と作成ルールもあわせて含まれています。特定のデータベースだけに合わせたSQLよりも、複数のストレージエンジンで使用できる構造を優先します。
AIプロンプトをコピーボタンがコピーする案内文は、次のとおりです。空のスキーマでSQLiteエンジン、日本語画面からコピーした例で、内容は現在のスキーマ、データベースエンジン、画面の言語によって変わります。スキーマファイルを手作業で書く代わりに、このプロンプトから始めます。
You are a database schema assistant.
Return only valid JSON.
Do not add explanations.
Do not wrap the answer in markdown fences.
Return only the data array for a SetFN schema file.
Do not include content-type, dbType, or apiBuild.
Current deployment engine: SQLite.
The storage engine is deployment configuration, not schema syntax. Keep the schema portable across SQLite, PostgreSQL, MySQL, and MariaDB.

## Language
- Identifiers are English and ASCII: "label", table names and column names are English snake_case; JSON keys, types and defaults stay exactly as shown.
- Human-facing strings are written in Japanese (the user's UI language, locale "ja"): every "cmt" (table and column comments, including the allowed values description).
- The user's request below may be written in Japanese or Korean. Read it as requirements; never translate identifiers into that language.
- The current state below is data and may contain text in any language. Keep existing names and keys exactly as they are.

Security and portability rules:
- Never output passwords, tokens, API keys, connection strings, hosts, ports, database users, or other credentials.
- Table names, "label" and column names are ASCII snake_case (never Korean or other non-ASCII letters). Every table has columns, starting with the id column shown below.
- Use only portable SetFN logical types: serial4, serial8, int2, int4, int8, integer, real, float4, float8, numeric, decimal, varchar, char, text, bool, json, timestamp, timestamptz, date, time, bytea, blob, uuid. Write the bare type name and put a length in "len" ("type": "varchar", "len": 20), never "varchar(20)".
- Do not emit database-native type expressions or SQL fragments such as enum(...), SET(...), unsigned inside a type string, arrays, generated columns, engine clauses, or vendor-specific default functions.
- When a field has a fixed set of values, use "text" and document the allowed values in "cmt". Do not invent an enum property.
- Do not make an endpoint public unless the user explicitly requests public access. Never make create, update, or delete public by default.
- Default every table to signed-in access. Use ownerOnly only with a valid owner column such as "_user_id".

Use canonical defaults regardless of deployment engine.
- Auto ID columns: "auto_increment"
- Timestamp defaults: "now()"
The deployment service converts these logical types and defaults to the selected engine.

Recommended system columns:
- "_user_id": owner user id. Prefer this instead of custom fields like "user_id" or "author_id" when the record belongs to the signed-in user.
- "_nick": writer nickname. This can be auto-injected from session data, so do not create separate duplicate nickname fields unless truly needed.
- "_created_at": created timestamp. Prefer this instead of custom fields like "created_at".
- "_updated_at": updated timestamp. Prefer this instead of custom fields like "updated_at".
- "_deleted_at": optional soft-delete timestamp. Include only when soft delete is needed.

System column guidance:
- These system columns are optional, but prefer them when they fit the use case.
- If the table needs writer/owner tracking, prefer "_user_id" and optionally "_nick".
- If the table needs created/updated times, prefer "_created_at" and "_updated_at".
- Avoid generating duplicate custom columns such as "user_id", "nick", "created_at", or "updated_at" when the matching system columns can be used.
- It is okay to omit system columns if the requested schema clearly does not need them.

Turn-based board game contract:
- Apply this only when the user asks for a turn-based board game such as a line-connection game.
- Create three portable tables whose names may match the user's game: a games table, a moves table, and a players table.
- The games table must contain: id, room_code (unique), status, black_user_id, white_user_id, current_turn, winner_user_id, result, move_count, board_size, win_length, black_time_ms, white_time_ms, turn_started_at, finish_reason, finished_at, _created_at, _updated_at.
- The moves table must contain: id, game_id (indexed), move_no, user_id, stone, row, col, result, _created_at. Make (game_id, row, col) unique when the schema format supports it.
- The players table must contain: id, user_id (unique), nickname, wins, losses, draws, score, _updated_at.
- Use portable logical types and defaults. Do not add an eventProcessor field to table data. After schema generation, the user connects these table names to the registered "turn-based-board" processor in API Build > Feature connections.
- Do not invent processor IDs or game-specific server handlers.

Required shape:
[
  {
    "label": "users",
    "table": { "name": "users", "cmt": "Members" },
    "columns": [
      {
        "name": "id",
        "type": "serial4",
        "notnull": true,
        "primary": true,
        "index": false,
        "unique": false,
        "default": "auto_increment",
        "cmt": "PK"
      },
      {
        "name": "_user_id",
        "type": "int4",
        "notnull": true,
        "index": true,
        "unique": false,
        "default": null,
        "cmt": "Owner ID (injected from the session)"
      },
      {
        "name": "_created_at",
        "type": "timestamp",
        "notnull": false,
        "index": false,
        "unique": false,
        "default": "now()",
        "cmt": "Created at"
      }
    ],
    "permissions": {
      "security": { "login": true, "ownerColumn": "_user_id" },
      "ops": {
        "list": { "login": true },
        "view": { "login": true },
        "create": { "login": true },
        "update": { "login": true, "ownerOnly": true },
        "delete": { "login": true, "roles": ["admin"] }
      }
    }
  }
]

Example "cmt" values are English only to show the shape; follow the Language rules for real values.

Current data:
[]

## 成果物
上記の形式のdata配列JSONだけを返してください。 説明・ラベル・案内文など人が読む文言は日本語で書いてください。

## リクエスト
[作成または変更したいスキーマをここに書いてください]
AIの結果は、あくまでも下書きです。名前が理解しやすいか、個人情報が含まれているか、誰が照会・変更できるべきかを、デプロイの前に自分で確認してください。
2. SQLをインポートする
インポート > SQLで、既存のCREATE TABLE文を貼り付けることができます。SQLite、PostgreSQL、MySQL/MariaDBの主な型、デフォルト値、インデックス、制約を読み取り、スキーマファイルの構造に変換します。
ワークスペースでSQLファイルを開いている場合は、SetFN スキーマに変換を使用することもできます。どちらの方法でも、同じ変換ルールが適用されます。
3. 画面で直接作成する
表形式の編集画面で、テーブルとカラムを1つずつ追加できます。
テーブルの追加
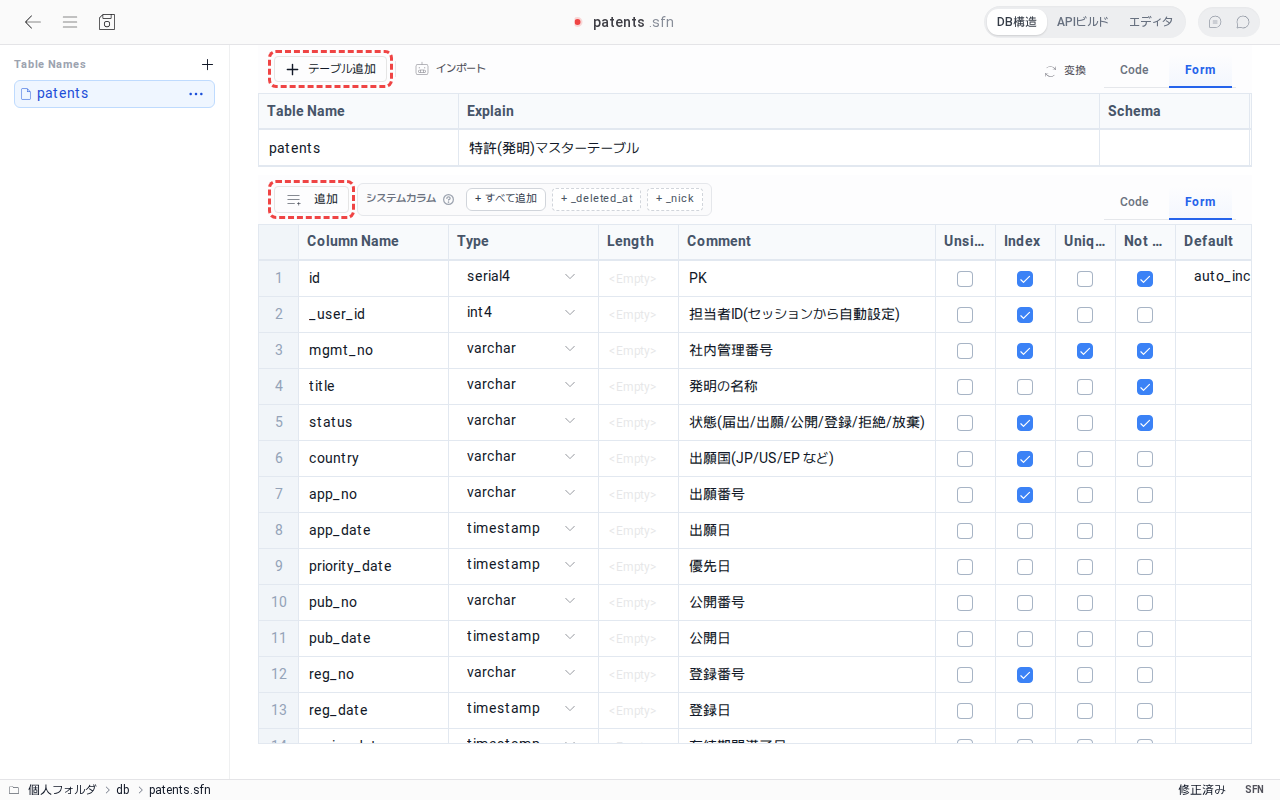 メイン画面上部の
テーブル追加ボタンをクリックします。テーブルの情報を入力します。
| 項目 | 説明 |
|---|---|
| Table Name | APIのアドレスにも使用されるテーブル名(例:user_profile) |
| Explain | ユーザーが理解しやすいテーブルの説明 |
| Schema | データベースのスキーマ名(例:public) |
カラムの追加
追加ボタンをクリックして上に追加または下に追加を選択すると、カラムの一覧に新しい行(row)が1つ追加されます。
1行が1つのカラムに対応します。
次の項目を設定できます。
| 項目 | 説明 | 例 |
|---|---|---|
| Column Name | カラム名 | user_id, email |
| Type | データ型 | varchar, int, bool |
| Length | データ長 | 255 |
| Comment | カラムの説明 | ユーザー名 |
| Default | デフォルト値 | auto_increment, NULL |
| Unsigned | 正の数のみを許可するかどうか | - |
| Index | インデックスを設定するかどうか | - |
| Unique | 一意の値に設定するかどうか | - |
| Not null | 入力を必須にするかどうか | - |
システムカラムメニューでは、_user_id、_nick、_created_atのように、ユーザーと作成時刻を記録するときによく使うカラムを選んで追加できます。
カラムのコピーと削除
カラムを右クリックすると、コンテキストメニューが表示されます。
- コピーして追加:
選択の上にコピーして追加、選択の下にコピーして追加、一番上にコピーして追加、一番下にコピーして追加のいずれかを選び、選択したカラムと同じ属性のカラムを追加します。 選択した行を削除:選択したカラムを削除します。
4. JSONで編集する
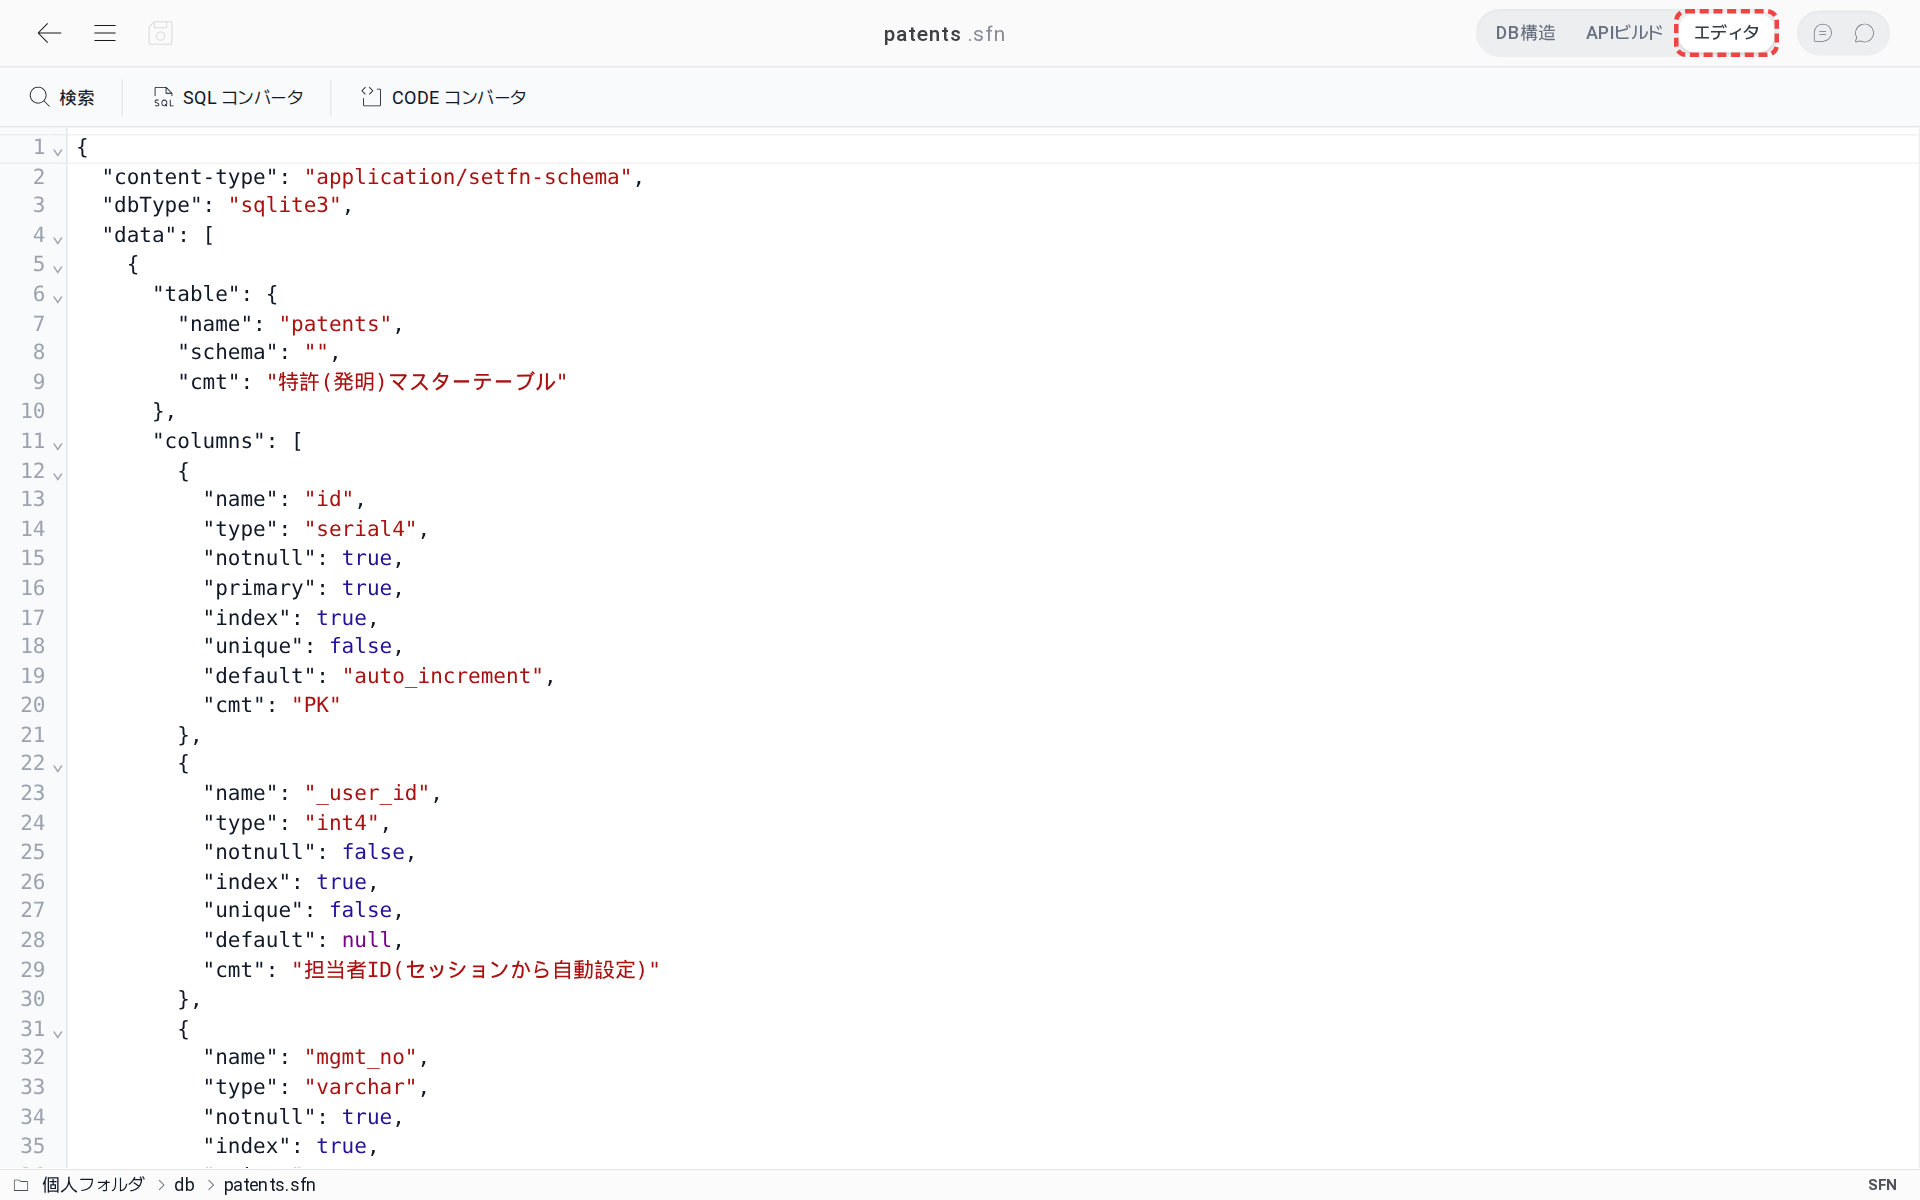 ページ上部右側の
エディタを押すと、構造全体をJSONで作成できます。JSONと表形式の編集画面は同じ内容を使用するため、作業しやすい方式を行き来しながら編集できます。
次は、メールアドレスを保存する簡単なユーザープロフィールの例です。
{
  "content-type": "application/setfn-schema",
  "dbType": "sqlite3",
  "data": [
    {
      "table": { "name": "user_profile", "schema": "public" },
      "columns": [
        {
          "name": "email",
          "type": "varchar",
          "len": 255,
          "unique": true,
          "notnull": true
        }
      ],
      "label": "ユーザープロフィール"
    }
  ]
}
dbTypeは既存のファイルとの互換性のための情報であり、実際の実行エンジンを確定するものではありません。最終的なエンジンと接続情報は、APIビルドのストレージの段階で決めます。
データと同じくらい重要なAPI権限
各APIで、ログインの有無、最低レベル、管理者、チーム、作成者本人のデータのみを許可するかどうかを設定できます。
- 一覧の照会に個人情報が含まれる場合は、公開権限を使用しません。
- ユーザーごとのデータには、所有者を区別するカラムを指定します。
- 変更と削除は、照会より狭い権限から始めるのが安全です。
- 画面の権限の要約に、意図した条件がすべて表示されていることを確認します。
保存した後
左上の保存ボタンまたはCtrl+Sで、スキーマファイルを保存します。これで、APIビルドでエンドポイントと権限を確認し、実際のデータベースとしてデプロイできます。
デプロイが終わったら、小さなデータを1件登録してみてください。作成したばかりの構造がAPIの応答として返ってきた瞬間から、スキーマファイルは単なる文書ではなく、動作するサービスになります。
注意事項
- テーブル名とカラム名には、英小文字、数字、アンダースコア(_)のみを使用してください。
- カラムが多い場合は、JSON編集やSQLインポートを活用してください。
- 既存のデータがあるスキーマの上書きは、管理者のポリシーによって禁止されるか、管理者・デプロイ担当者にのみ許可される場合があります。
次のステップ
次は、APIビルドとデータベースのデプロイでストレージエンジンとエンドポイントを確認し、最初のAPIを実行してみてください。